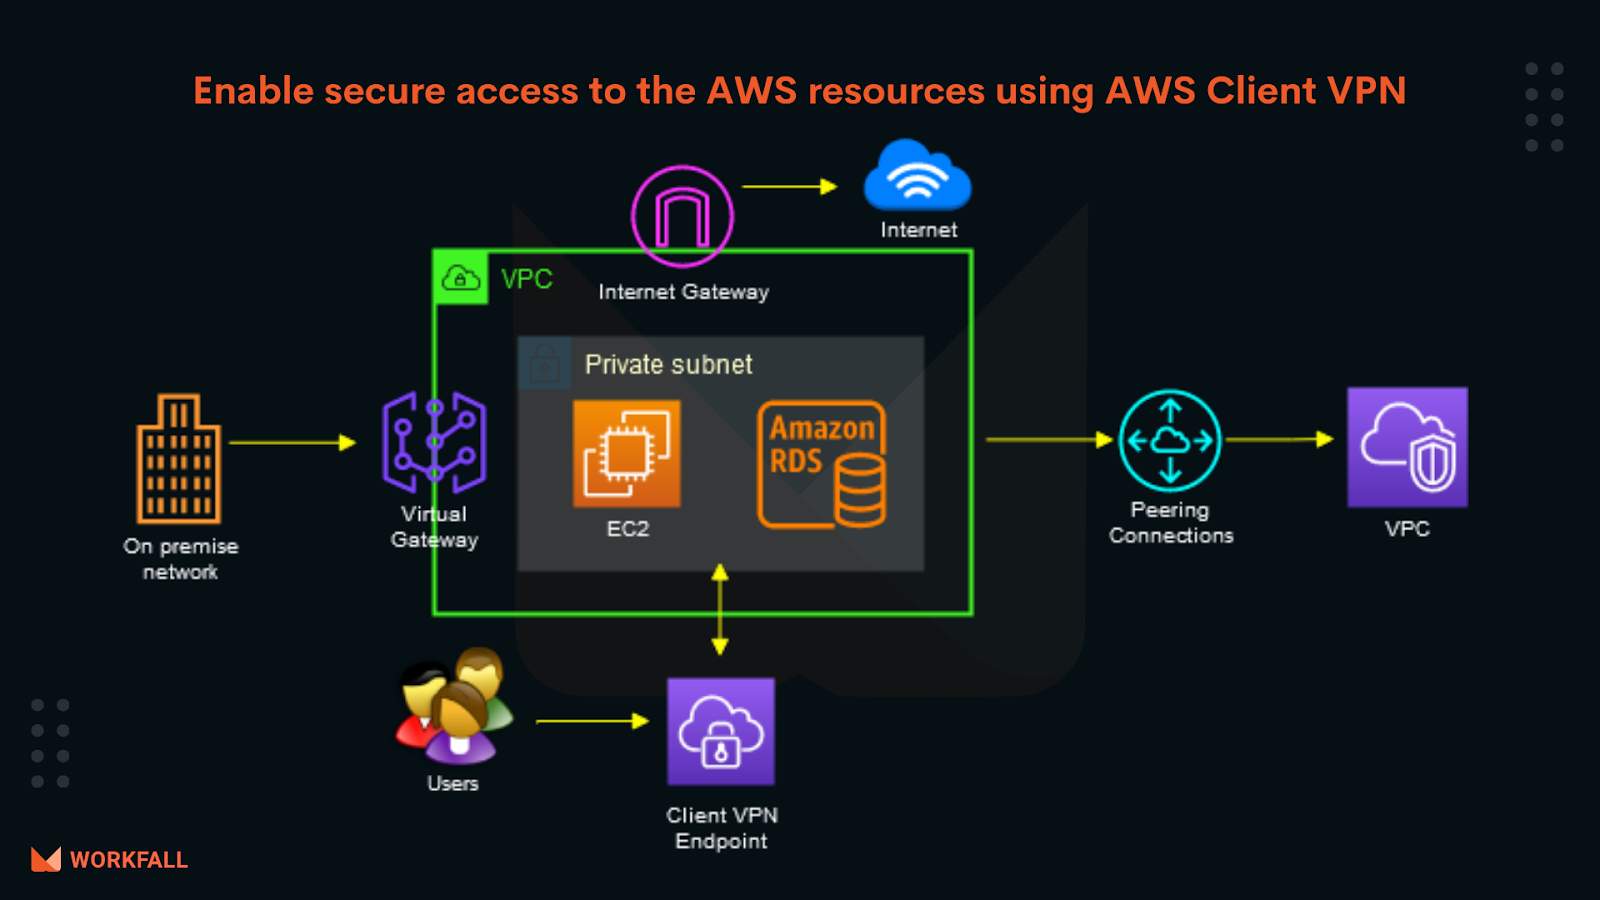
If you’re looking for a solution that enables secure access to the AWS resources and also the servers hosted in the On-premise network you’re reading the right blog! With the help of the Client VPN endpoint, you can allow users from any geographical location to access the resources in AWS and on-premise using an OpenVPN-based VPN client. In this blog, we will discuss AWS Client VPN, its features, components, pricing, etc. We will do hands to understand how AWS Client VPN works! We will see how to set up a Client VPN endpoint to securely access and manage AWS Services.
Let’s explore!
In this blog, we will cover:
- What is AWS Client VPN?
- Features of Client VPN
- Key Components of Client VPN
- Limitation of Client VPN
- Pricing of Client VPN Endpoint
- Scenarios that work with Client VPN
- Working on AWS Client VPN
- Generating Server and Client certificates & Keys
- Uploading Certificates to AWS Certificate Manager
- Connection Logging
- Creating Client VPN Endpoint
- Associating and DisAssociating Subnets
- Client VPN Configuration
- Conclusion
What is AWS Client VPN?
- It is an AWS-managed client-based VPN service that will help us to access the AWS resources Securely.
- Client VPN endpoint can also be used for On-premise servers as well.
- We can access AWS resources from any location using OpenVPN client with AWS client VPN.
Features of Client VPN
- Managed Service
As It is an AWS-managed service, We don’t need to deploy and manage any VPN solutions.
- Authentication
It supports client authentication using Active Directory, federated authentication, and certificate-based authentications.
- Secure Connections
It provides secure TLS connections using OpenVPN clients from any location.
- Deep Integration
It can be easily integrated with existing AWS services such as VPC and AWS Directory service.
- Manageability
We can manage the active client connections and also we have the ability to terminate the active client connections. We can check connection logs with the information about client connection attempts.
- High Availability & Elasticity
It has the capability to scale based on the number of users’ connections to AWS and On-premise resources.
Key Components of Client VPN
- Client VPN Endpoint
This the resources that we create and configure to enable and manage Client VPN connections.
- Client VPN network interfaces
We will create the client VPN endpoint in the subnet that is associated with any traffic to the VPC and will be sent through the Client VPN network interface with the help of the client VPN endpoint.
- Client VPN Ports
Client VPN supports ports 443 and 1194 for TCP and UDP.
- Client
The end user from any location connected to the Client VPN endpoint to create a VPN session.
- Routes
The Client VPN endpoints will have route tables that will have information about the available destination network interfaces.
- Authorization Rules
It restricts the users who can access the network.
- Target Network
The Target network is the network interface that we associate with the Client VPN endpoint with the help of Routes.
- Connection Logging
We can enable connection logging for the client VPN endpoint to log client connections and these logs can be stored in CloudWatch log groups using which we can analyze how the client VPN is being used and or debug connection issues.
- Self Service portal
A self-service portal can be enabled for the client VPN endpoint, It is a web-based portal using which the end users can download the latest version client configuration and the latest version of the AWS-provided VPN client.
Limitations of Client VPN
The AWS Client VPN has the following limitations as follows:
- Client CIDR ranges cannot overlap with the local CIDR of the VPC in which the associated subnet is located, or any routes manually added to the Client VPN endpoint’s route table.
- Client CIDR ranges must have a block size of at least /22 and must not be greater than /12.
- A portion of the addresses in the client CIDR range are used to support the availability model of the Client VPN endpoint, and cannot be assigned to clients. Therefore, we recommend that you assign a CIDR block that contains twice the number of IP addresses that are required to enable the maximum number of concurrent connections that you plan to support on the Client VPN endpoint.
- Client VPN supports IPv4 traffic only.
- Client VPN is not Federal Information Processing Standards (FIPS) compliant.
- The client CIDR range cannot be changed after you create the Client VPN endpoint.
- The subnets associated with a Client VPN endpoint must be in the same VPC.
- The self-service portal is not available for clients that authenticate using mutual authentication.
- You cannot associate multiple subnets from the same Availability Zone with a Client VPN endpoint.
- A Client VPN endpoint does not support subnet associations in a dedicated tenancy VPC.
- If multi-factor authentication (MFA) is disabled for your Active Directory, a user password cannot be in the following format.
SCRV1:<base64_encoded_string>:<base64_encoded_string>
Pricing of Client VPN Endpoint
- You are billed per active association per Client VPN endpoint on an hourly basis. Billing is pro-rated for the hour.
- You are billed for each client VPN connection per hour. Billing is pro-rated for the hour.
Scenarios that work with Client VPN
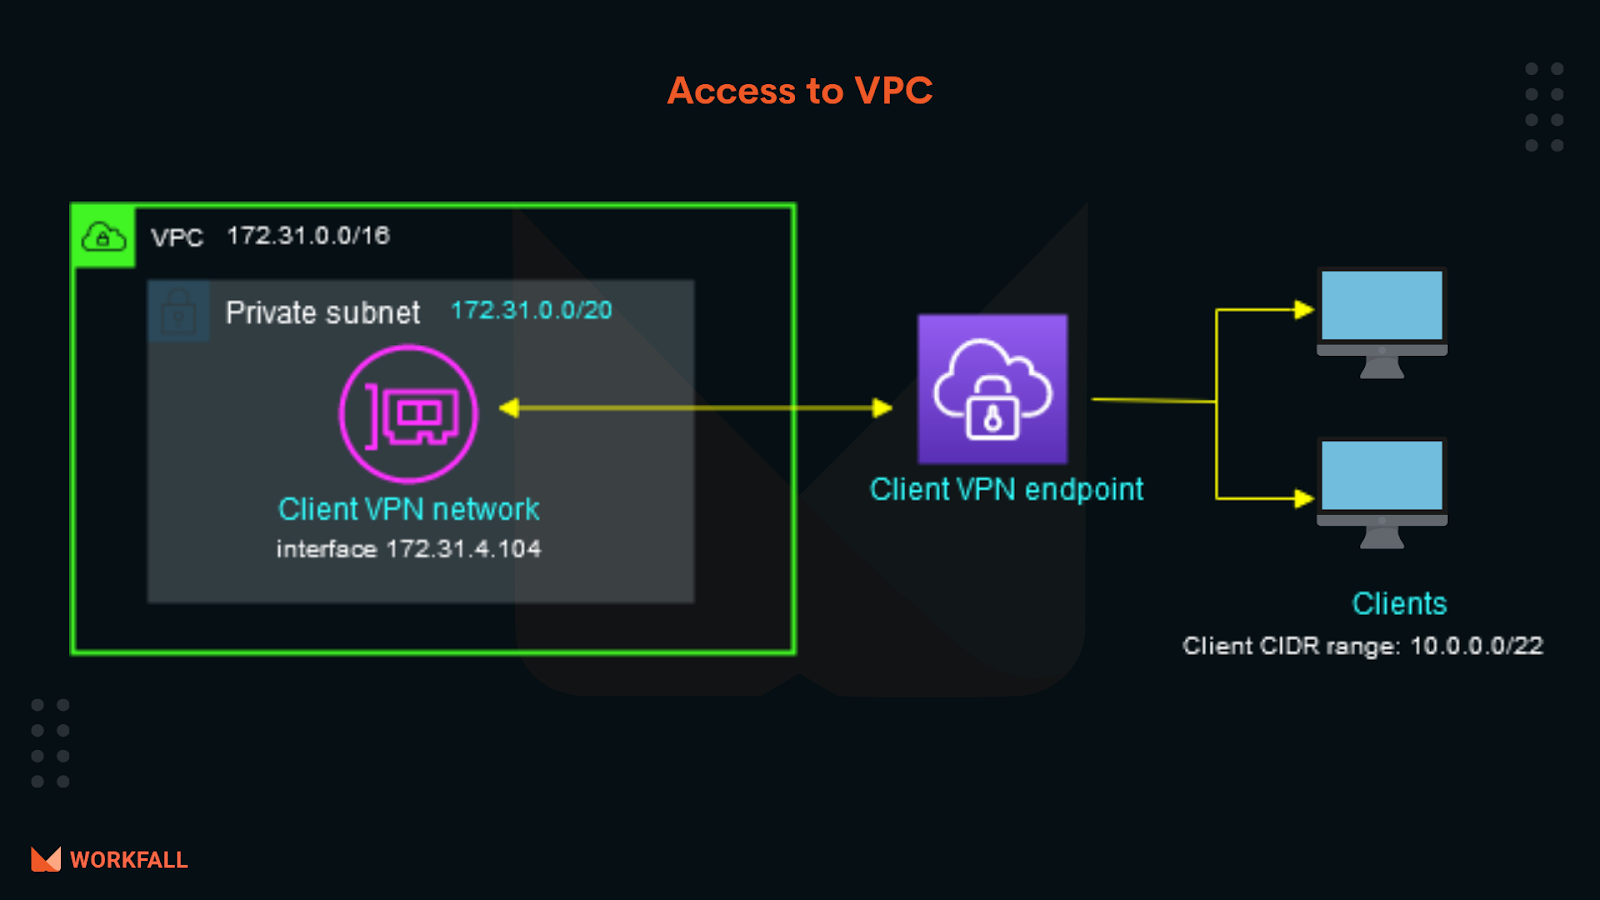
- Access to a VPC
This scenario targets a Single VPC. You can implement this setup if you want the clients to access the resources inside the single VPC only.
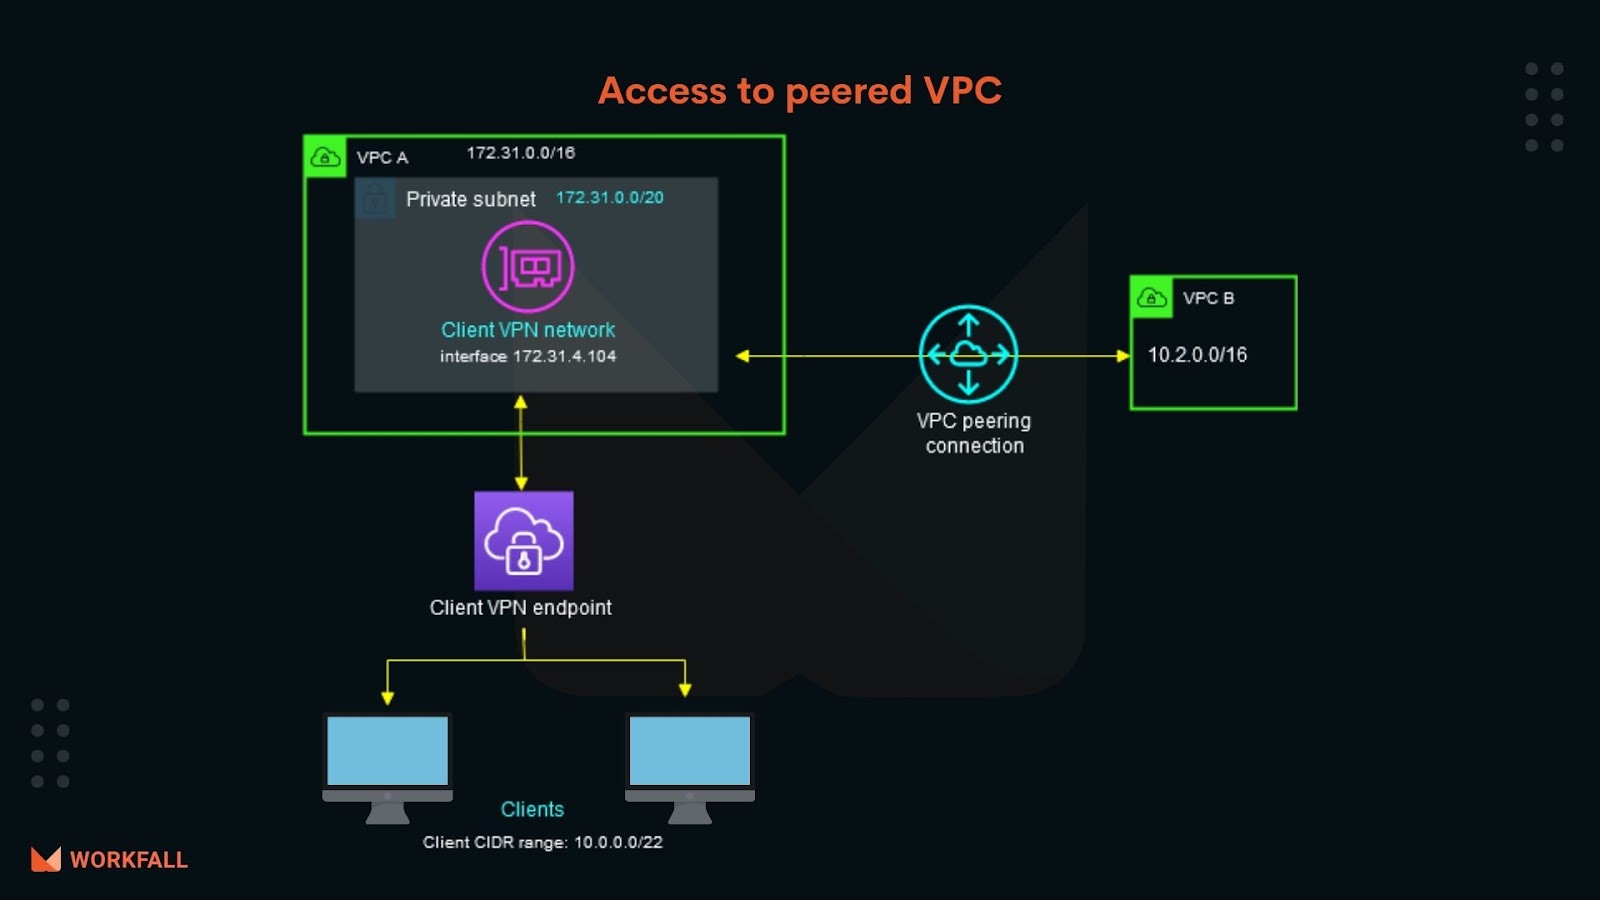
- Access to a peered VPC
This scenario includes a Target VPC (VPC A) which is peered with another VPC (VPC B). You can implement this configuration if you want the client to access the resources in the target VPC and other VPC that are peered with it.
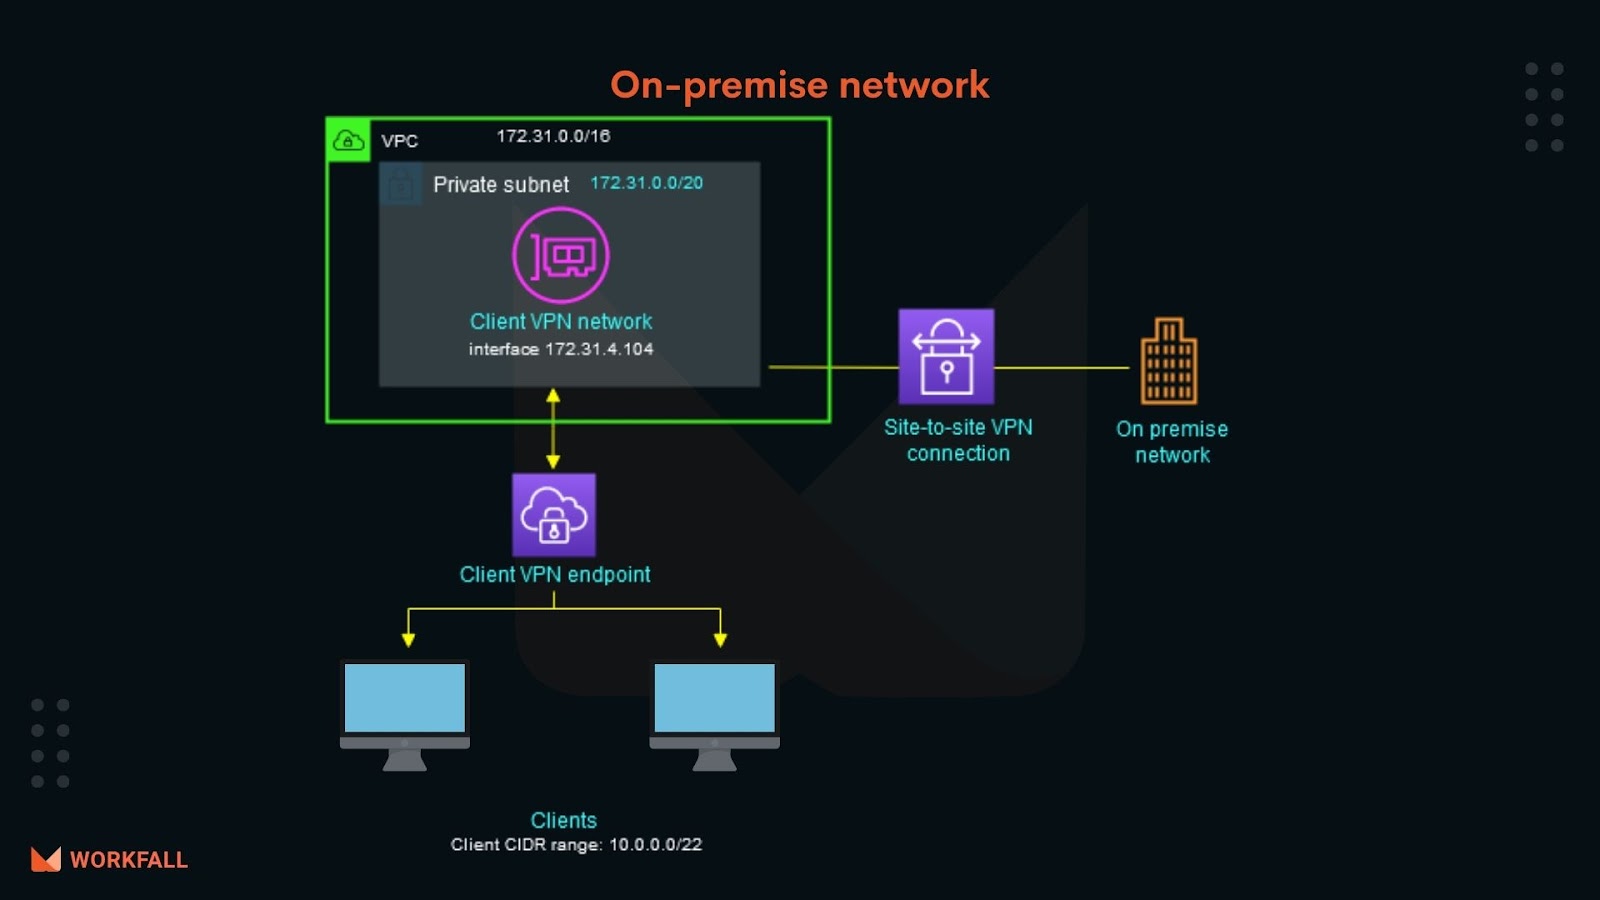
- Access to an On-premise network
Implementing this scenario will allow access to the resources in the On-premise network only. With the help of client VPN , Users can access the on-premise servers.
- Access to the internet
This scenario targets a single Target VPC and access to the internet.This configuration allows the end users to access the resources in the single target VPC and allows access to the internet.

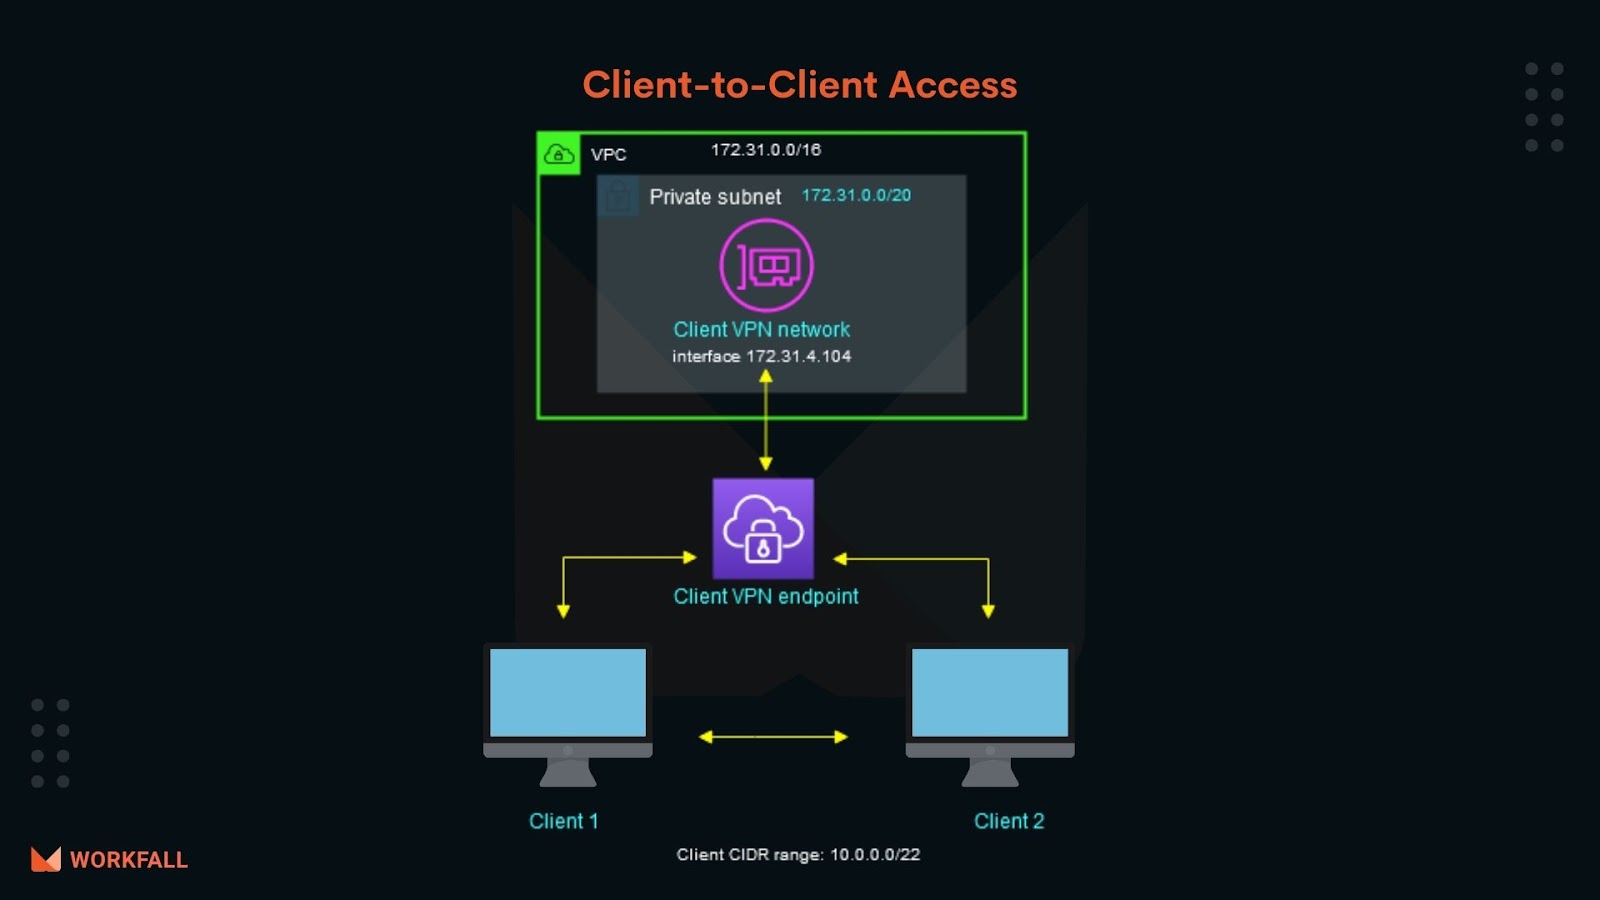
- Client-to-Client Access
This scenario allows a client to access a single VPC and enables clients to route traffic to each other.
Use this configuration If the client connects to the same Client VPN endpoint and also needs to communicate with each other.
The CIDR range of the clients can be unique while connecting between each other.
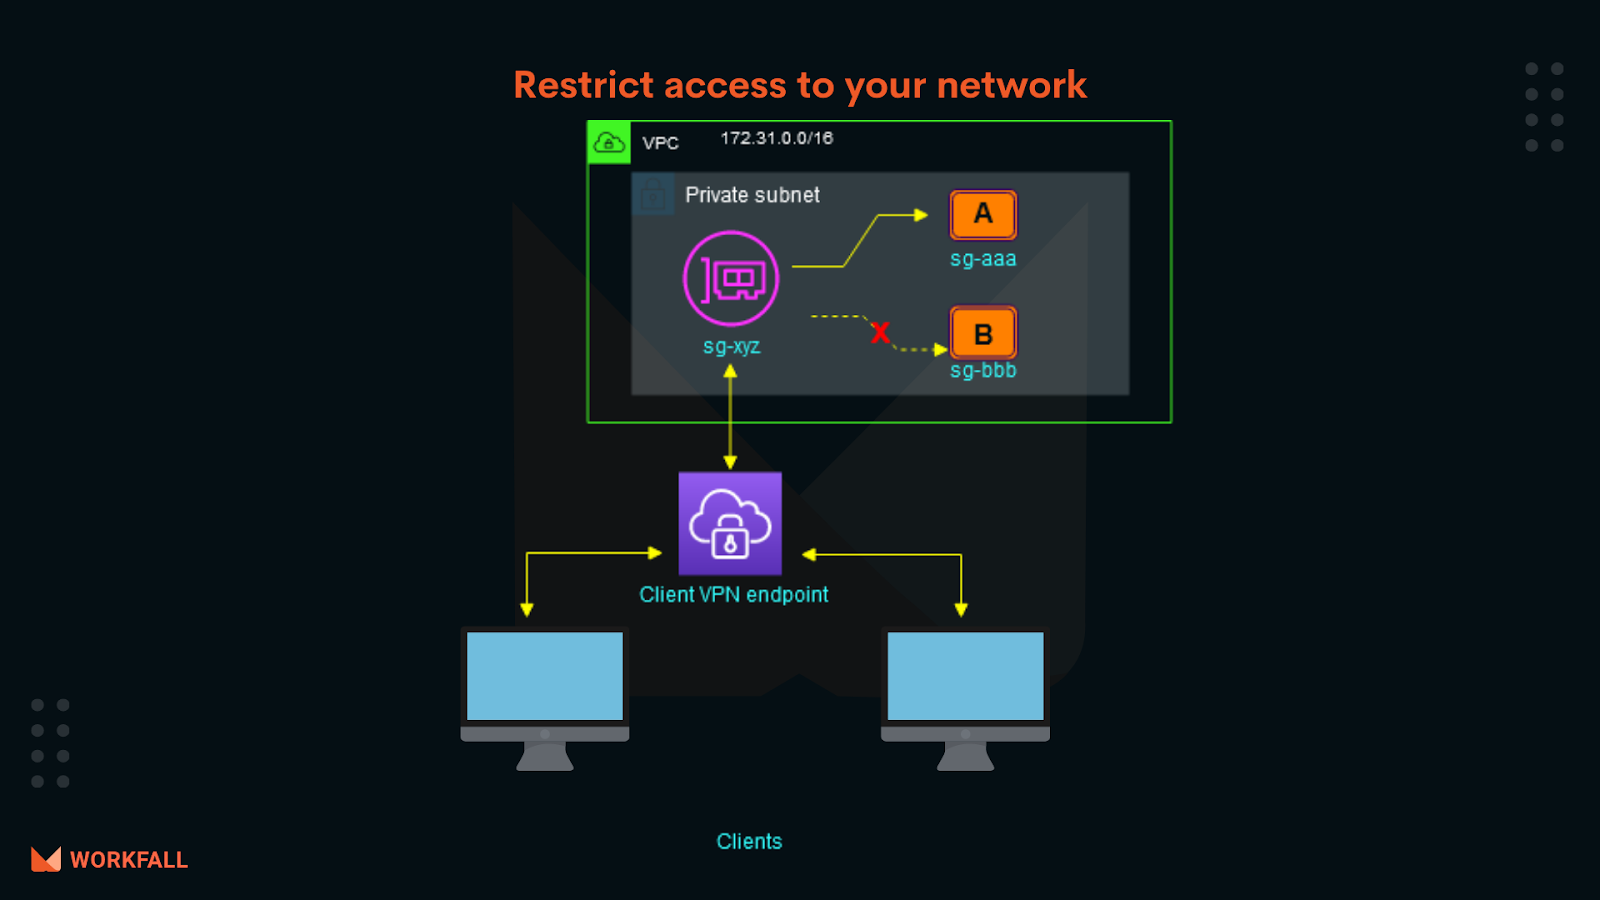
- Restrict access to your network
Configuring this scenario you can restrict access to specific AWS resources within your VPC.
If you’re using user-based authentication, Based on the user group, you can restrict access to specific parts of your network.
Working on AWS Client VPN
With AWS Client VPN, there are two types of user personas that interact with the Client VPN endpoint: administrators and clients.
Administrator:
- The administrator is responsible for setting up and configuring the service.
- This involves creating the Client VPN endpoint, associating the target network, and configuring the authorization rules, and setting up additional routes (if required).
- After the Client VPN endpoint is set up and configured, the administrator downloads the Client VPN endpoint configuration file and distributes it to the clients who need access.
- The Client VPN endpoint configuration file includes the DNS name of the Client VPN endpoint and authentication information required to establish a VPN session.
Client:
- The client is the end user.
- This is the person who connects to the Client VPN endpoint to establish a VPN session.
- The client establishes the VPN session from their local computer or mobile device using an OpenVPN-based VPN client application.
- After they have established the VPN session, they can securely access the resources in the VPC in which the associated subnet is located.
- They can also access other resources in AWS, an on-premises network, or other clients if the required route and authorization rules have been configured
Hands-On
- Generating Server and Client certificates & Keys
- Uploading Certificates to AWS Certificate Manager
- Uploading Server Certificates
- Uploading Client Certificates
- Connection Logging
- Creating Cloudwatch log group
- Creating Cloudwatch log stream
- Creating Client VPN Endpoint
- Associating and DisAssociating Subnets
- Download Client VPN Configuration
Generating Server & Client Certificates
Lets create a Client VPC endpoint using AWS Console. Make sure to create the client VPN endpoint in the same region as of VPC.
There are different modes of authentication with the VPN endpoint service.
- Mutual Authentication
- Active Directory Authentication
- Single Sign-on (SAML-based federated authentication)
In this hands-on, We are going to use Mutual authentication.
- With mutual authentication, Client VPN uses certificates to perform authentication between the client and the server.
- Certificates are a digital form of identification issued by a certificate authority.
- The server uses client certificates to authenticate clients when they attempt to connect to the Client VPN endpoint.
- You must create a server certificate and key, and at least one client certificate and key.

For mutual Authentication we need to create Server and Client certificates and keys using OpenVPN easy-rsa and
Once the certificates are generated , we should upload the keys and certificates of the server and client to AWS Certificate Manager.
Easy-rsa is a tool to build and manage certificate Authorities and public keys.
The easy-rsa project is located at OpenVPN GitHub
https://github.com/OpenVPN/easy-rsa
First Lets clone the repository to the local system.
Lets create a folder named easy-rsa and clone the repo there.
#mkdir easy-rsa
#cd easy-rsa
#git clone https://github.com/OpenVPN/easy-rsa

Once the package is downloaded , Go to easyrsa3 folder and then run the below commands.
To create or to re-initialize a new PKI environment,
#./easyrsa init-pki

In order to sign requests to produce certificates , We need CA. To create a new CA in a PKI ,
#./easyrsa build-ca
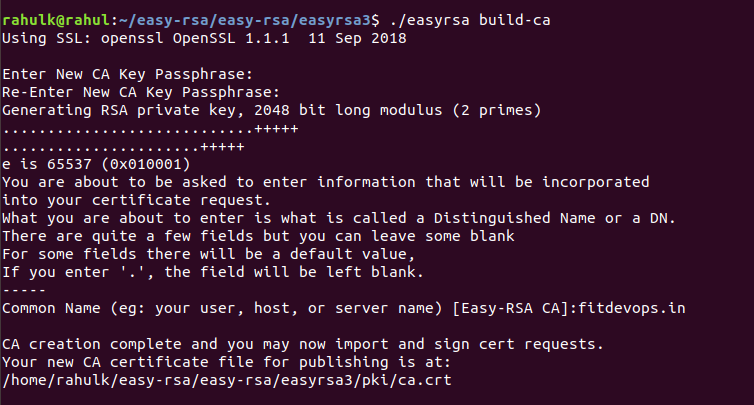
If you wish to generate CA without password , Run the below command.
#./easyrsa build-ca nopass
Next we have to generate a Server certificate.
#./easyrsa build-server-full server nopass

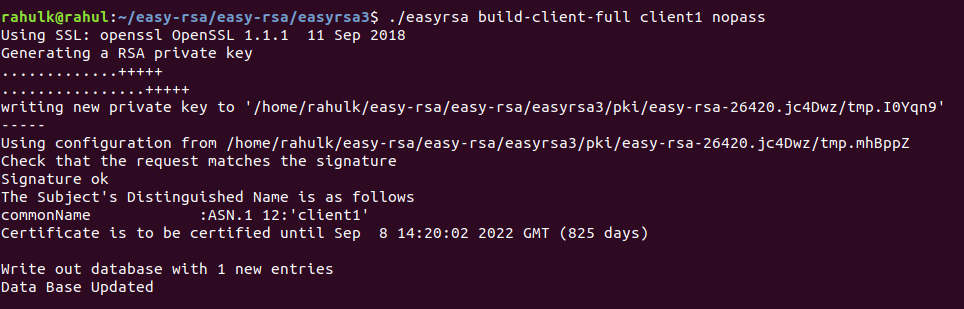
Lets generate client certificates.
#./easyrsa build-client-full client1 nopass
Lets create a folder and store all the keys and certificates into that folder.
#mkdir certificates
#cp pki/ca.crt certificates/
#cp pki/issued/server.crt certificates/
#cp pki/issued/client1.crt certificates/
#cp pki/private/server.key certificates/
#cp pki/private/client1.key certificates/
We have copied all the certificates and keys to the certificates folder.
We need to upload the server certificates to ACM which can be used while we configure Client VPN Endpoint.
Uploading Certificates to AWS Certificate Manager
To upload the certificates to AWS Certificate Manager , Login to AWS Certificate Manager Console.
Under Provision certificates , Click Get Started and then choose Import a certificate

Under Select Certificate , We need to provide the Server certificate details which we have generated using easyrsa.
You will be asked for three details.
We need to copy and paste the certificates accordingly as shown below.
Certificate body –> server.crt
Certificate private key –> server.key
Certificate chain –> ca.crt
Once the certificates are pasted , Click Next and Import.
Now the Status of the certificate should be issued.
Now Following the same procedure, We need to import the Client certificates and keys.

Once the server and the client certificates are imported.
Make a note of the ARN of the Server and client certificates , We will be using it while configuring client VPN endpoint.
Connection Logging
Connection logging is a feature of AWS Client VPN that enables you to capture connection logs for your Client VPN endpoint.
A connection log contains connection log entries. Each connection log entry contains information about a connection event, which is when a client (end user) connects, attempts to connect, or disconnects from your Client VPN endpoint.
You can use this information to run forensics, analyze how your Client VPN endpoint is being used, or debug connection issues.
Connection logging is available in all Regions where AWS Client VPN is available.
Connection logs are published to a CloudWatch Logs log group in your account.
For Connection Logging, If you wish to log the details on client connections and push the logs to cloudwatch , Choose Yes and provide the Cloudwatch Log group and Cloudwatch log stream.
Let’s go ahead and create a cloudwatch log group and cloudwatch log stream from Cloudwatch Console.
Login to Cloudwatch Console, In the navigation pane, Under Logs, Click Log groups.
Click Create log group, Provide a name for the log group and click Create.
We should also create a log stream, To do so, Choose the created log group and then click Create log stream
Provide a name for the log stream and click Create.

Now We have a cloudwatch log group and log stream available for the Client VPN to log all the connections.
Creating Client VPN Endpoint
Login to VPC Console, In the navigation pane , Under VIRTUAL PRIVATE GATEWAY Choose Client VPN Endpoints.
Click Create Client VPN Endpoint
Provide a name for the VPN Endpoint.
The Client IPV4 CIDR , this is the subnet from which remote users will get IP addresses. For example, the remote IP for my system is 192.168.0.102 and the subnet is 192.168.0.0/24.
So Before providing the Client IPV4 CIDR , We should check with the Network team and get the right subnet details and create client VPN Endpoints.

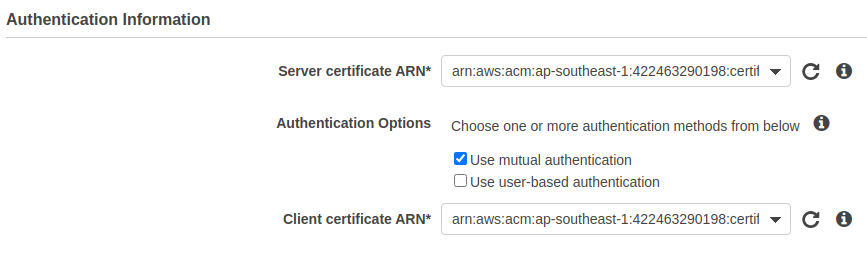
Under Authentication information , Choose the Server certificate ARN , This will be taken from the ACM.
For Authentication Options , Use mutual authentication and then choose the Client certificate ARN.
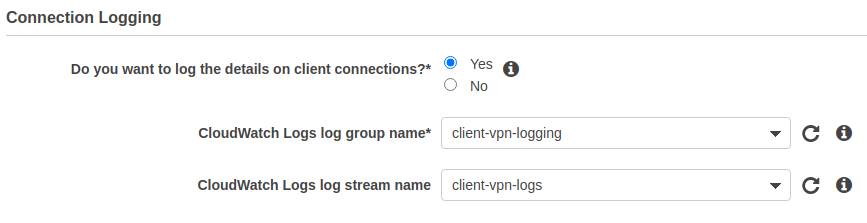
For Connection Logging , Choose Yes and then select the cloudwatch log group and log stream which you have created.
By default , Client VPN uses UDP transport protocol , To use TCP transport protocol , select TCP
and then Choose the VPC ID for which the Client VPN endpoint should be associated and then select one or more VPC’s security groups to apply to the client VPN.
And then choose the port number for the VPN , The default port is 443.

Optionally , To generate Self Service portal for the client , Enable Self service portal
With the help of Self Service portal , The client can access the portal via browser and can download the Client VPN endpoint configuration file and they can download the latest version of the AWS provided client.

Once all the required details are provided , Click Create Client VPN Endpoint
Once the client VPN endpoint is created , It will be in a pending-associate state.
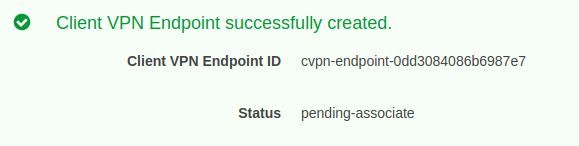
We need to associate the Client VPN endpoint with the VPC and the subnet.
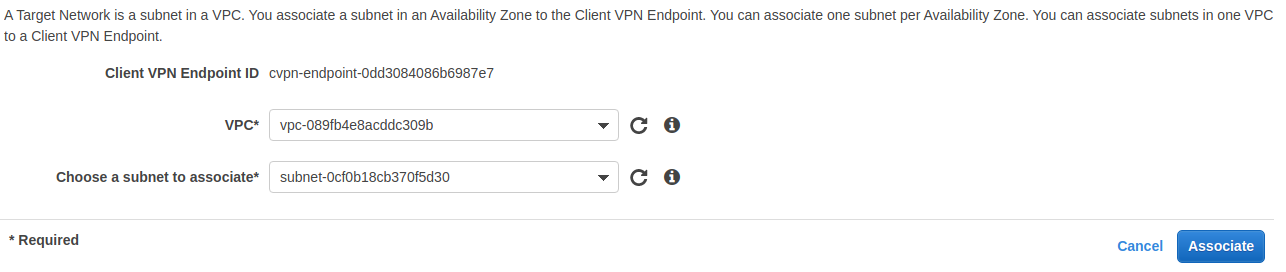
Select the created Client VPN Endpoint and Choose Associations and Click Associate
Select the VPC and the subnet to be associated with the VPN endpoint.
and then click Associate.The status of the endpoint will be in Associating state.


It will take a few minutes for the VPN endpoint to be Associated.
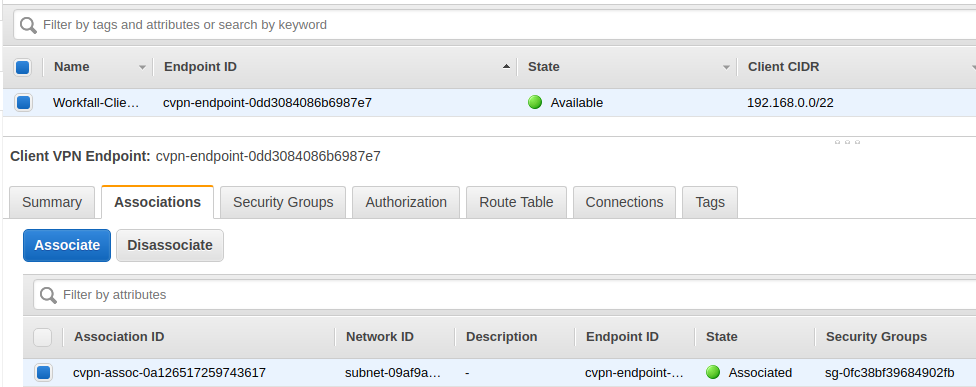
Finally , The VPC and the subnet are in Associated state and the Client VPN Endpoint is Available to use.
Associating and DisAssociate Subnets
If you wish to add or remove subnets from the Client VPN Endpoint , Go to VPC console.
Choose the Client VPN Endpoint , Under Associations , Click Associate ( To add a new subnet)
Choose the VPC and the subnet that you want to associate with the Client VPN and then click Associate
Your new subnet is associated.
To disassociate / remove subnet from the Client VPN , Under Associations , Choose the subnet and then click Disassociate

Client VPN Configuration
Once the Client VPN endpoint is ready , We need the client to establish a vpn connection with the vpn endpoint.
For that, we need to install a VPN client tool on the user’s system.
On Ubuntu, We can install the OpenVPN client using the below command,
sudo apt-get install openvpn
For Windows and MacOS, The client VPN can be downloaded from the below URL.
https://aws.amazon.com/vpn/client-vpn-download/
Once the VPN client is installed on the end user’s system, We need .ovpn file , OpenVPN client configuration file.
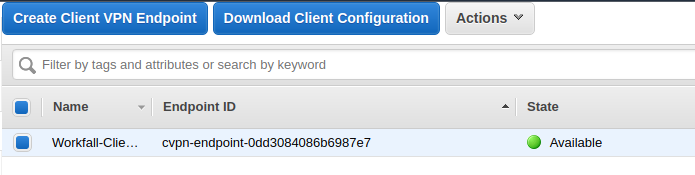
We can download the .ovpn file from AWS Console. Go to VPC Console,
Choose Client VPN Endpoints, Select the VPN endpoint and then click Download client configuration and then click Download

We can distribute the Client certificate and the Keys (Which we have generated earlier) to the end users along with the .ovpn configuration file.
Open the .ovpn configuration file and add the below configurations to the end of the file/
cert /path/client.crt
key /path/client.key
Once the cert and the key are added to the configuration file. Save and close the file.
On Linux systems, using the below command We can establish the VPN connection.
sudo openvpn --config downloaded-client-config.ovpn
you should get the response as shown below.

We have established a connection to the VPC endpoint and now we are able to access the AWS resources in the VPC.
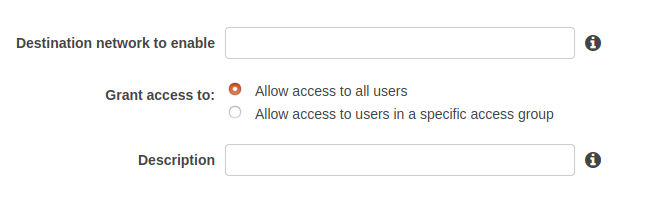
Finally , We need to configure the Authorize Ingress on the Client VPN Endpoints page.

Here we are going to mention the target network where all the AWS resources are hosted.
The destination network is the CIDR range of the VPC itself. As we’re using mutual authentication, Grant access allows access to all users
Now the VPC is authorized.
We have successfully established the VPN connection using Client VPN, hence we should be able to access the AWS resources with the help of VPN Endpoint.
With the help of Client VPN endpoints, We should be able to access the Private server and endpoints such as EC2, RDS etc.
Conclusion
In this blog, we have implemented a solution to allow secure access to the AWS resources with the help of Client VPN Endpoints. We have also discussed the different ways of establishing Client VPN connections that deliver different purposes. We will discuss more on security in our upcoming blogs. Stay tuned to keep getting all updates about our upcoming new blogs on AWS and relevant technologies.
For any further queries, feel free to post your comments, we are happy to help!
Meanwhile …
Keep Exploring -> Keep Learning -> Keep Mastering
This blog is part of our effort towards building a knowledgeable and kick-ass tech community. At Workfall, we strive to provide the best tech and pay opportunities to AWS-certified talents. If you’re looking to work with global clients, build kick-ass products while making big bucks doing so, give it a shot at workfall.com/partner today.